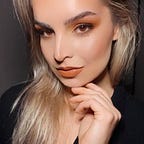
Peaches n’ Berries INSPIRED EYE MAKEUP Tutorial
Hello everyone! It’s been ‘forever and a half’ since I’ve been on here. I’m excited to be back and showcase to you my makeup skills :)
Throughout the year, I’ve been eye’ing off many Instagram photos of ‘finished makeup looks’ from beauty enthusiasts, varying from colours and pigments, to technique and style.
With this look here, I was inspired by the AMAZING new eyeshadow palette range from ChiChi Comsetics. Their latest palettes included cool nude’ish brown tones, to warm n’ rich pigments.
This look in particular, I used the ‘Exotic Empress’ Eyeshadow Palette. ONLY using 3 shades. HOW incredible!
As per usual, I will be showing you guys a STEP by STEP tutorial on how I was able to achieve this look.
STEP 1: Prime the eyes. Conceal the lid. Set the base.
— — — — — — — — — — — — — — — — — — — — — — — — — — — — — — —
STEP 2: Using the pink shade (3rd row, far left), swipe this shade all over the lid, focussing the pigment in the crease.
STEP 3: With a blending brush, continue to buff the shade on the ‘outer-V’ of the eye. We want to build the pigment
STEP 4: Begin to blend this shade towards the brow. This will be used also for the transition shade.
— — — — — — — — — — — — — — — — — — — — — — — — — — — — — — —
STEP 5: Using the DARKEST berry shade in the palette. PACK on the colour on the ‘outer-V’, using a dense shadow brush.
STEP 6: With a blender brush, begin to blend the shade within the crease, making its way towards the inner portion of our crease.
STEP 7: Repeat Step 5 and 6 to intensify the Dark berry shade.
STEP 8: Whilst blending this shade in our crease, slightly blend this shade up towards the brow, but have it gradiently blend into the 1st shade.
— — — — — — — — — — — — — — — — — — — — — — — — — — — — — —
STEP 9: Using the lightest shade (the bottom LEFT pigment), with a flat eyeshadow brush, pack on the colour over the lid and stopping it a little over 1/2 way of our lid space.
STEP 10: Before popping on our lashes, lets coat them with a mascara, that adds Length and Volume.
— — — — — — — — — — — — — — — — — — — — — — — — — — — — — — —
STEP 11: Compliment the eye look using Natural-Whispy lashes.
STEP 12: Using any black pencil liner, draw along your water line.
STEP 13: Using a 2nd shade (the dark berry), accompanied with a small-dence shadow brush, sweep the pigment along the bottom lashline. Have this pigment smudge and blend into the black pencil liner.
— — — — — — — — — — — — — — — — — — — — — — — — — — — — — —
STEP 14: Going into the palette, use the 1st shade (with a blending brush) and sweep this along the bottom lash line.
This’ll create an ombre effect from a dark berry, melting into a light-warm peach tone.
STEP 15: With your bottom lashes, lightly coat them.
We want only our top lashes to be fuller :)
STEP 16: SELFIE TIME!
Thank you guys so much for checking out my latest tutorial.
As always, keep your eyes peeled over on my other social media platforms. I LOVE to post all things beauty, food-related or Lifestyle-inspired pic’s.
INSTAGRAM: nikki.c.photography
