…OCEANIC Oasis…
Throughout social media, thousands and thousands of makeup enthusiasts would’ve all seen the many shades of lipsticks, the upcoming brow products AND…….. the ever-growing EYESHADOWS and pigments.

The ‘iconic’ loose pigment every makeup lover will know about, is the ‘Blue-Brown’ shade.
In one of my EYE makeup tutorials, I used this pigment.. and guess what?…. I’m using the same colour again EXCEPT… I’m going to be using the M.A.C Cosmetics’ Loose Pigment in ‘Blue Brown’.
Today’s tutorial, I will also be using a ‘very highly hyped’ makeup product too, MORPHE’s 35OM Eyeshadow palette.
To see how I achieved this look, just keep scrolling down.
— — — — — — — — — — — — — — — — — — — — — — — — — — — — — — —
STEP 1+2+3:
1:Prime the lids
2:Neutralise the lid with a skin-toned liquid-cream foundation/concealer
3:Set the entire lid with a face powder or any setting powder
— — — — — — — — — — — — — — — — — — — — — — — — — — — — — — — -


STEP 4: Using the last shade on the 2nd row, swipe this along the crease and combine this step with a blending brush.

— — — — — — — — — — — —
Step 5: Going in with a blender brush, place the shade ( 2nd last eyeshadow) along the crease. Concentrate this colour along the outer corner of the crease.

— — — — — — — — — — — —
Step 6:
Going with with a pencil brush first, grab the shade (the last row, 3rd colour), and being to slightly blending that into the Outer 3rd of the lid.
Begin to place this shade along the outer end of the lash line.
— — — — — — — — — — —


Step 7: Using a small flat brush, place this shade along the lid. Concentrate this shade within the inner third and middle area of the lid.
To make the pigment more intense, spray your flat brush with a Setting Spray.
— — — — — — — — — — — — — — — — — — — — — — — — — — — —


Step 8: Coat your lashes with a mascara
Step 9: LASHES! Find a pair of lashes that have more length and volume at the end’s of the lash band. This will help to show MORE of the loose pigment.
— — — — — — — — — — — — — — — — — — — — — — — — — — — — —
Step 10: From the 3 shades that we used, first go in with the darkest shade and buff this along the bottom lash line.
Step 11: Next, use the 1st and 2nd shade, blend this along the bottom lash line.
Step 12: Line the waterline with a nude-toned eye pencil. This’ll give the appearance of bigger eyes.
Step 13: Coat your bottom lashes with mascara.

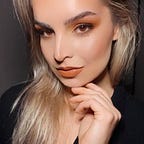
Step 14: SELFIE!!!
Thank you so much for checking out my latest tutorial. If you have any questions or enquiries, please feel free to send me over a message.
To keep up to date with my latest pic’s and posts, head over to my other social media platforms:
Instagram: nikki.c.photography
Facebook: www.facebook.com/nikki.cross95
❤ ❤ ❤