GRUNGE GLAMOUR
EYE MAKEUP TUTORIAL

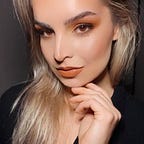
What a time it’s been. Over these last few months, I’ve been diving back into makeup & have grown my love for it Again. Lot’s has happened throughout 2020 & 2021, but I thought that it would be fun to show you guys this look that I created. A lot of this look was majorly inspired by BEAUTY CREATOR & INFLUENCER, Jamie Genevieve.
Last year, Jamie Genevieve joined the Makeup World with her brand ‘VIEVE MUSE’. One particular product she created, was the ‘ESSENTIAL’ eyeshadow palette.
The aesthetic of this makeup look, resembles the ‘worn makeup’ one would have on throughout their night & having some slight eyeshadow ‘exaggeration. When I think of the word ‘grunge’, I relate it to the style of rock music & in saying that, checkered tops, ripped jeans, textured messy hair & a strongly worn eye makeup look.
If you guys would love to see how I created this look, keep scrolling down & follow along to my STEP by STEP tutorial.

\\\\\\\\\\\\\\\\\\\\\\\\\\\
///////////////////////////
STEP 1: Place a BASE for your eyeshadows. Ideally, its best to work with a sticky-like base so the powdered pigments have something to grip onto.
You can either use your fingers to place & blend out the product.
The base I used, was a from a stick foundation.

\\\\\\\\\\\\\\\\\\\\\\\\\\\
///////////////////////////

STEP 2: Once your base is on. Start with the shade, ’CIAO’ using a fluffy brush.
The placement for this is to be over the entire lid, within the crease & up towards the brow bone. This also works as the gradient tone when we go in. with the darker shades.
One rule I like to remember, is ‘’LESS IS MORE’’. The more intense you want the pigment then after each application, apply more product onto the brush & lightly intensify the lid.
NOTE: Rather going into detail with specific branded brushes, I want to encourage anyone to use whatever brushes you have, regardless of what brand its from. (At the end of the day, it doesn’t really matter).
\\\\\\\\\\\\\\\\\\\\\\\\\\\
///////////////////////////
STEP 3: Once our first shade is on & spread over the lid, dive into the shade ‘COSY’ & ‘BUFF’.

Using a fluffy brush, concentrate the shades in the same placement as the 1st shade, HOWEVER, up towards the brow bone, ONLY have ‘CIAO’ as the furthest/uplifted shade.
Going back into our terminologies, from this darker shade onwards, begin to focus more of the pigments on the ‘Outer V’ of your crease. This’ll help create an effortless dimension to your eye shape.

\\\\\\\\\\\\\\\\\\\\\\\\\\\\\
/////////////////////////////
STEP 4: Using a smaller round-domed brush, go in with ‘DELICIOUS’ & ‘LAVAROCK’.
Concentrate these pigments within the Outer-V of the eye & tightly within the Outer crease of the lid.
Remember, the more intense you want to go with this look, keep adding a little more pigment to the lid. This’ll just make you look more like a ROCKSTAR, in my opinion. x

\\\\\\\\\\\\\\\\\\\\\\\\\\\\
///////////////////////////
STEP 5: Using any BLACK Kohl pencil/crayon, begin to line your waterline & ABOVE the top lash line.
At this stage, the exact placement is not precise. Once the lining is done, go in with a dense-flat brush & begin to smudge.
This step will create that ‘smokey’ look.
While you’re blending, slightly create a ‘winged effect’. For myself, I chose not to go in with a drawn on wing, however using a smudged effect from the pencil, this’ll make it seem minimal & effortless. For this look, I preferred to keep the eyeshadows as the ‘eye captivator & not a winged liner.
\\\\\\\\\\\\\\\\\\\\\\\\\\\\\/////////////////////////////


STEP 6 & 7: Coat your lashes with whatever colour mascara you prefer for this look. This colour I’m using is ‘BROWNISH BLACK’.
This next step is optional for lashes. If not, continue the steps further below to complete the look :)
For lash choice, I wanted something that’ll still allow the eyeshadows to be showcased & not hidden behind too much lash bristles.
Of course, these choices in products are totally based on preference. If you’d like to go in with a darker mascara, by all means go for it!!
\\\\\\\\\\\\\\\\\\\\\\\\\\\\\/////////////////////////////
STEP 8:
Once our lashes/mascara is on, we’re going to start working on our bottom lashes & waterline.

With the a small-flat brush, go in with the shade ‘GOODNIGHT’ & begin to blend the black kohl pencil. Avoid dragging the pigment too far down the eye, as we want to create a gradient effect with the other pigments, shortly.
\\\\\\\\\\\\\\\\\\
//////////////////
STEP 9:
Going in with a small-domed brush, place the shade ‘LAVAROCK’ & ‘DELICIOUS’. Begin to blend these 2 shades with the black shade & slightly drag this down the eye, just ‘slightly’.
\\\\\\\\\\\\\\\\\\\\\\\\\
/////////////////////////
STEP 10: Using a fluffy brush (used for the 2nd step), go into the shade ‘CIAO’ & start to blend the shades below the lid.

As you can see in this image, the black has diffused & blends into the lighter brownish shades.
Going in with ‘CIAO’ & ‘COSY’ shades, this’ll mimic the same technique we did on our top lid.
Having these shades, being the furthest dragged out, still allowing ‘CIAO’ to be the first pigment you see under the eye.
\\\\\\\\\\\\\\\\\\\\\\\\\\\\\
/////////////////////////////
STEP 11:

To finish this look, the last shade to use is ‘GLIMMER’ & a touch of ‘KARAT’.
These 2 pigments are going to concentrated under the ARCH of the brow & the INNER portion of our lid.
Why under the brow bone?
This just emphasises the highest part of our eyes & ties it all together by placing glitter in this spot. Plus to some degree, the glitter for this look, exaggerates the look of your skin perspiring.
A little fun fact for you guys to know. haha*
When placing the glittery shades onto the INNER portion of your lid, also dab these pigments onto the start of your tear duct. This step alone, ties the eye-look together.


The last step for this look to be complete, find yourself a complimenting lip shade. My preference, I chose a medium-toned brown lip product. This just SCREAMS ‘Grunge Goddess’.
And of course as usual, take as many selfies to really hype up the feelings of this look.
I hope you guys enjoyed this very-much needed EYE Makeup look. Its been a long-waited tutorial for you & now you can achieve this look whenever the occasion calls for it.
If you guys want to see more of this type of content, let me know.
To keep up to date with my latest pic’s & posts, head on over to my other social media platforms.
— — — — — — — — — — — — — — — — — — —
INSTAGRAM: @nikki.c.photography
FACEBOOK: www.facebook.com/nikkiCrossphotography
❤ ❤ ❤ ❤ ❤