…BASIC EYE Makeup TUTORIAL…
Have you ever looked in the mirror.. then down at the time on your phone.. then back in the mirror.. and asked ‘’Can I even be bothered putting any eye makeup on AND still look decent?’’. — Well guess what, I have a solution!
For today’s look, I wanted to create an eye look that was so simple and easy to accomplish.

Lets be honest, a lot of the time we really can’t be bothered putting any eye makeup on. — Oh which brings me to let you peep’s know, I didn’t include false lashes in this tutorial. YAY! If however you wish to complete the look with lashes, by all means.. go for it :)
To learn how I achieved this look, just keep scrolling down …
— — — — — — — — — — — — — — — — — — — — — — — — — — — — — — —
STEP1: Prime the lids
— -
STEP 2: Conceal the lids with whatever skin pigmented formula you use
(foundation/concealer, etc)
— -
STEP 3: Set the eyes with a powder
(this keeps it in place)
========================================


STEP 4: Grab yourself a taupe (cool-toned) brown pigment and place this along the outer crease, sweeping it along the inner crease.
- Use a blender brush for this step
========================================


STEP 5: Beginning to warm up the eye, use the burnt orange shade and place this exactly the same as the previous shade.
- Concentrate this pigment more in the outer crease and slightly blend out towards the brow — use between the blender brush AND a pencil brush:
- (blender brush — to gradient-ly shade the crease and diffuse the intensity)
- (pencil brush — to pat on the dark eye shadows before blending)
========================================

STEP 6: Using the light beige shade (top LEFT corner), pat and swipe this on the inner third of the lid. We aren’t completely changing the eye look, we are simply lightening it.
========================================


STEP 7: Line the top lash line with a brown pencil liner.
- This’ll act as a ‘lash thickener’, thus no need to wear false lashes
- Keep a thicker line along the outer portions of the lash line
========================================

STEP 8: Using the 2 darkest shades, smudge this where you had drawn on the liner.
- This’ll set in place the liner and ‘smoke out’ the lash line too
=======================================


STEP 9: Coat your top lashes.
- Coat your lashes, between a light-medium layer
=======================================

STEP 10: Line the water line.
========================================

STEP 11: Smudge the liner with the 2 deep shades
- Once the liner has been smudged out, grab the burnt orange and the deep plum shade… and swipe this along the bottom lash line.
- This’ll warm up the eyes and diffuse the intensity of the deep shades
========================================

STEP 12: Using the same mascara for our top lashes, its now time to coat the bottom lashes
=======================================
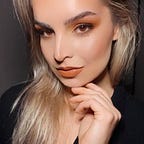
STEP 13: SELFIE TIME!


=======================================
Thank you so much for checking out my latest tutorial.
To catch up with my latest pic’s and posts, then head over to my other social media platforms:
FACEBOOK: www.facebook.com/nikkicross95
INSTAGRAM: nikki.c.photography
If you have any questions or want to know ‘HOW TO’.. shoot me over a message on my Insta or Facey :)
Until next time, have a good one!
❤ ❤ ❤